 Dash of Inspiration
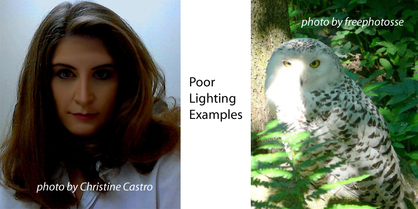
Post for GCU Community Blog 1) Poor Lighting Lighting can make or break a photograph, after all a photograph IS a collection of light. Harsh lighting causes washed out detail in the highlights (whites) and lens flare. Low lighting can cause color shifts, muddy blacks without detail, color noise and blurry edges due to camera shake. On camera flash often causes the a flattening ... Read Full Article!
0 Comments
The Fundamentals of Focusing Techniques Photo Tip for October 2011  Selective Focusing Example by Doreen Erhardt© There are a variety of focusing techniques that professional photographers use to create stunning images. It may be the most important feature in any given photograph, with beautiful lighting being a close second. There are terms which are applied to many of these methods, but unless you truly understand the fundamental guidelines behind each of these skills, you will not achieve successful results and your images may be considered blurry rather than pleasing. In this article we'll discuss when and how to apply Focusing Effects to create images like the professionals. A blurry photograph does not give a dreamy or soft focus effect. Though it may not be obvious to the amateur eye the difference between an out-of-focus photograph vs. a photograph where a skilled focusing effect has been properly applied; it is very noticeable to the trained eye and most often even to the eye of the average viewer even though they can only describe it as blurry. This is something the amateur really needs to focus on . . . pun intended! Let's begin with the terms for these techniques with some descriptions and examples of these focusing methods. The Dreamy Effect  Beautiful example of the Dreamy Effect Photo courtesy of PhotoshopTutorials.com The photographs you see with a Dreamy Effect are created using a variety of techniques, none of which are manipulating your focus; intentionally or unintentionally. A dreamy effect is created on-camera using either a soft focus filter or something in front of the lens such as pantyhose or Vaseline, in combination with (usually natural) lighting. More commonly created today using post-processing techniques in some combination to create a dreamy glow that is soft but not blurry. Soft Focus  Lovely example of Soft Focus Photo courtesy of Wallcoo.net Soft Focus is not a term used in conjunction with Depth of Field as they are not related. A soft focus image is a sharp image with an ethereal haze effect applied. This is an on-camera filtering technique and/or post-processing technique to soften harsh elements in the photograph, such as; wrinkles and smoothing out skin. This effect is commonly used on portraits of women, for weddings and for romantic images. An out of focus photograph or a photograph with blurry primary elements is not a successful example of applying creative focusing techniques, it's just a blurry photograph. Bokeh 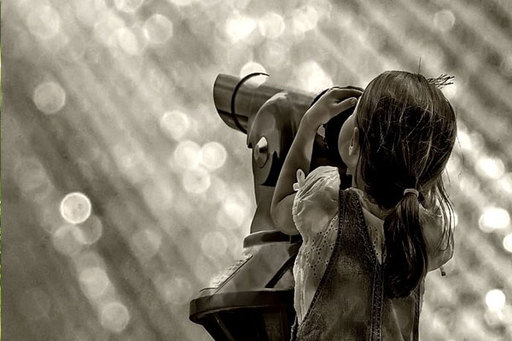 Excellent example of proper Bokeh effect in a photograph Photo courtesy of © Silvia Lorenzo The Bokeh effect in photography is Japanese in origin and refers to a blur or blurry quality to a PORTION of the photograph. Soft focus and Bokeh have fundamental differences. In a photograph with soft focus there is an intentional blurriness added to the subject while the edges of the subject retain their sharp focus. In Bokeh, it is only an element of an image intentionally blurred for the specific effect of emphasizing certain points of light. Macro Photography 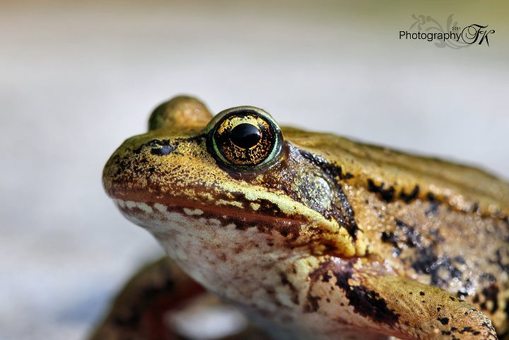 Outstanding Macro Example Photo courtesy of Photography TK Designs© A quick side note on Macro photography because it is a world of it's own. First let me explain that Macro Photography is not close-up photography. There is typically a one to one ratio between the size of the subject and the size on the image sensor in Macro Photography, this is not the case with close-up photography which can be achieved with any lens. Macro lens have a very shallow DOF so they utilize selective focus to keep the subject sharp while letting everything else blur. This is the one exception to the basic focusing rules, HOWEVER, the result still needs to make sense to the viewing audience. The small area of focus range in a Macro shot MUST BE in the right place or the photograph is considered blurry and unappealing. Selective Focus  Selective Focus Example Photograph © John Baker Photographer LLC/Travel Images.com/JayBeeStock.com Selective Focus is the process of focusing on one element within the scene to create emphasis on that element. This can not be done with a camera setting of Auto, you accomplish this by running the camera manually to achieve a wide aperture and obtain a shallow depth of field. Today's Digital SLR cameras all have focusing points which can be used in conjunction with Depth of Field control to carefully select the area(s) where sharp focus is needed. As in ALL good photographic shots, you first need to know the message you are trying to portray to determine which elements in your shot are PRIMARY focal points, which are secondary and which can or should fade completely into the background. Your primary subject needs to have absolute sharp focus in all the right places. Your secondary elements can have soft focus where the DOF starts to drop off, and your non-essential elements can be out of focus. Below is a great example: There is a chocolate kiss in the front with sharp focus, i.e., the Primary Focal Point. Just behind that other candies begin to drop out of focusing range; the secondary focal points which help tell the story of where the kiss came from, with the remaining elements falling completely out of focus. Now for commercial sales, the background really should be cleaned up in this photograph to remove the distraction of the doorjamb, but otherwise this is a well-focused photograph.  Photo courtesy of Kimberly Gauthier© So What's a Primary Focal Point? In portrait shots of people, it is critical to have the eyes, face and hair that surrounds the face in sharp focus. Depending on the mood of the message, the rest of the person can fall into the secondary focus category allowing DOF to drop away. If the story you are trying to tell in a photograph is of a person holding something, then the primary focus point needs to include head to waist in include what they're holding with focus not dropping off until waist level and/or behind the head.  Primary Focal Points: Head to Waist Photo courtesy of cyndaily.blogspot.com When photographing animals; in a head to mid-section shot, the eyes, nose and ears must be in focus with the DOF falling off behind the head and/or below the chest. In a full body shot of an animal, the focus needs to be from head to toe if they are engaged with their environment.  Purrfect Selective Focus Photo courtesy of www.pictures-of-dogs.info/ You can focus on one petal of a flower and have all others fall out of focus, but the human eye does not accept that as appealing if that single focal point is the petal which seems to be the furthest away from the image foreground. If you shoot a flower at an angle where the center of the flower is of particular interest and that center falls out of focus, this too is usually not considered pleasing. If you photograph a lily or tulip straight on for example, as long as the center of the flower is sharply focused, the petals can fall out of focus and create a pleasing effect. Are you beginning to see that the elements which require sharp focus are critical to your overall composition? You can have a perfect specimen of a flower (free of bugs, dying petals, etc.), beautiful lighting, stunning composition and if you ignore the vital decision to choose the right focusing technique to support all that perfection; you will have ruined your composition.  Primary Focal Point Flower Center by Doreen Erhardt© Foreground Elements Though it is true that selective focus is used to emphasize the subject thus throwing much of the rest of the photograph out of focus, there are some things to consider when trying to pull off the effect. Do not think that using this focusing technique is a way to 'remove' distracting elements . . . it is not, especially when those distractions are in the foreground. What DOES work is when the element in the foreground has a direct relationship to the subject and rest of the scene, i.e.; the lockers which create repetition, or grasses in a meadow, or petals on a flower. There must be a blending of the out of focus foreground leading the eye to the primary focal point. Elements like dead branches in a garden or pet bowls in front of the pet cause the eye to reject what they are seeing rather than be drawn in by the color, harmony and blending of the foreground. It will make or break a photograph and this is a far too common mistake for the amateur photographer.  Wonderful Example of Foreground Selective Focus Photo courtesy of Scott Thomas Photography© What hasn't been discussed here is WHAT Depth of Field is and HOW to achieve it - that article was already written and you'll find that here: Focus on Depth of Focus.
We also have not touched on the difference between showing Motion Blur and a blurred photograph due to motion. That article you will find here: Motion Capture Photography Until next time; May you Stay Focused and Happy Shooting! 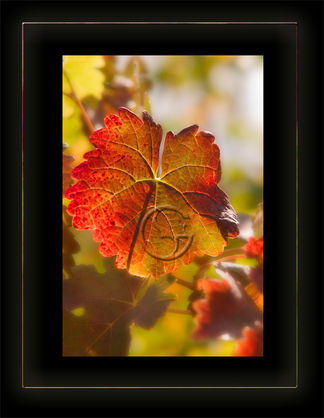 Focus on Depth of Field Photography Tip for August 2009 If any of you have 'hung around" with photography buffs, you may have heard them refer to Depth of Field (DOF) when composing a photo, but what exactly are they talking about? Well it's really kind of simple in terms of 'what it is', but can be complicated for amateur to understand how professional photographers successfully achieve it. The DOF in a photograph simply put is the range of distance that the subject is acceptably sharp. When you look at a photograph, controlling the DOF is how backgrounds get blurred out of focus allowing the subject to stand out, such as the photo I've shown here. DOF is also responsible for having the blades of grass in the foreground appear in focus as well as the mountains in the distance of your picture. Depth of Field will vary with camera type, focusing distance and aperture, so the best way to achieve your goals consistently is to know how to calculate for the best result. Depth of Field in a photograph gradually changes from sharp to out-of-focus both in front of and in back of the focusing distance. Have you ever taken a photograph of an animal where their eyes were in focus, but their nose was blurry? Or taken a picturesque shot of an outdoor scene and had the foreground sharp but the hills blurry or vice versa? Most likely these were DOF calculation errors. There are four main factors that control your Depth of Field, lens aperture, lens focal length, distance to subject and film/digital sensor size. Since the latter can't be changed and your focal distance to the subject is usually decided by your choice of composition, that leaves us with using your lens aperture as your primary control over DOF. For those of you who love to get into the scientific calculations, believe me those exist so go forth and do your research to learn more!
Keys to remember: BIG Aperture = SMALL F/Stop Number = Narrow Depth of Field LARGE Aperture = BIG F/Stop Number = Wide DOF Here are some Tips: 1) Bringing attention to your subject by blurring the background means that you want to shoot using Aperture Control and f/stops between f/2.8, f/4 or f/5.6, this is referred to as 'selective focus'. To bring those grasses in the foreground into focus along with the mountains in the background, shoot with f/16 or f/22. 2) You will want to focus about one-third of the way into the scene because Depth of Field extends further behind your subject than in front, so keep this in mind when determining your point of focus. 3) For those of you using an SLR, you have the benefit of knowing that when you look through the view finder you are seeing the world through the lens of the camera. Most digital SLR cameras have a nice feature called Depth of Field Preview. This allows you to set your aperture and see the true DOF by pressing the preview button (look in your manual to see if you have one and where it is located). The preview will always be dark or dim, but you should still be able to preview. 4) Focal length is a factor of which you should be aware. For example a 200mm lens has a narrower DOF than 35mm focal length lens. So, to achieve the DOF you are after, sometimes it's possible to adjust your focal length by changing your distance to the subject resulting in better depth of field. 5) When stopping down the lens (higher f/stop number), you are letting in less light to the camera, so you'll need to compensate to get the correct exposure. Either you'll need to use a longer shutter speed or a higher ISO. The latter is rarely my choice because of the increased noise which is not an acceptable trade off for me. Digital cameras by the way, have been made to emulate the film-based versions quite well when it comes to noise artifacts. So use a tripod whenever possible under these conditions. With these basics in mind, as always I am a firm believer of bonding with your camera so that you will know exactly how it will respond to changes you make when out taking pictures. I encourage you to pick a subject outside your home, something that will stay in the same place so you can run test shots, view them on your computer, and then go back out to be sure you can get the same results twice. Choose a mailbox, fountain, or gnome; something like that. Now set your camera to Aperture Priority Mode. Photograph your gnome many times, each time altering the aperture, point of focus and focal length. Be sure to do this when you have time and LOG your shots. Be sure to mark the distance from your gnome so you can repeat the process and understand the point of focus when compared to the f/stop and focal length. If you take the time to do this exercise, you will be able to get consistent results on the fly! Good Shooting May the Focus Be With You! |
Resources
Here we archive our Photo Tips, Tutorials, Marketing Tips and Preset Downloads from all our sites. ENJOY! Categories
All
My favorite
|


|
|

Commercial License Holder
|

Salon of Art
on Red bubble